

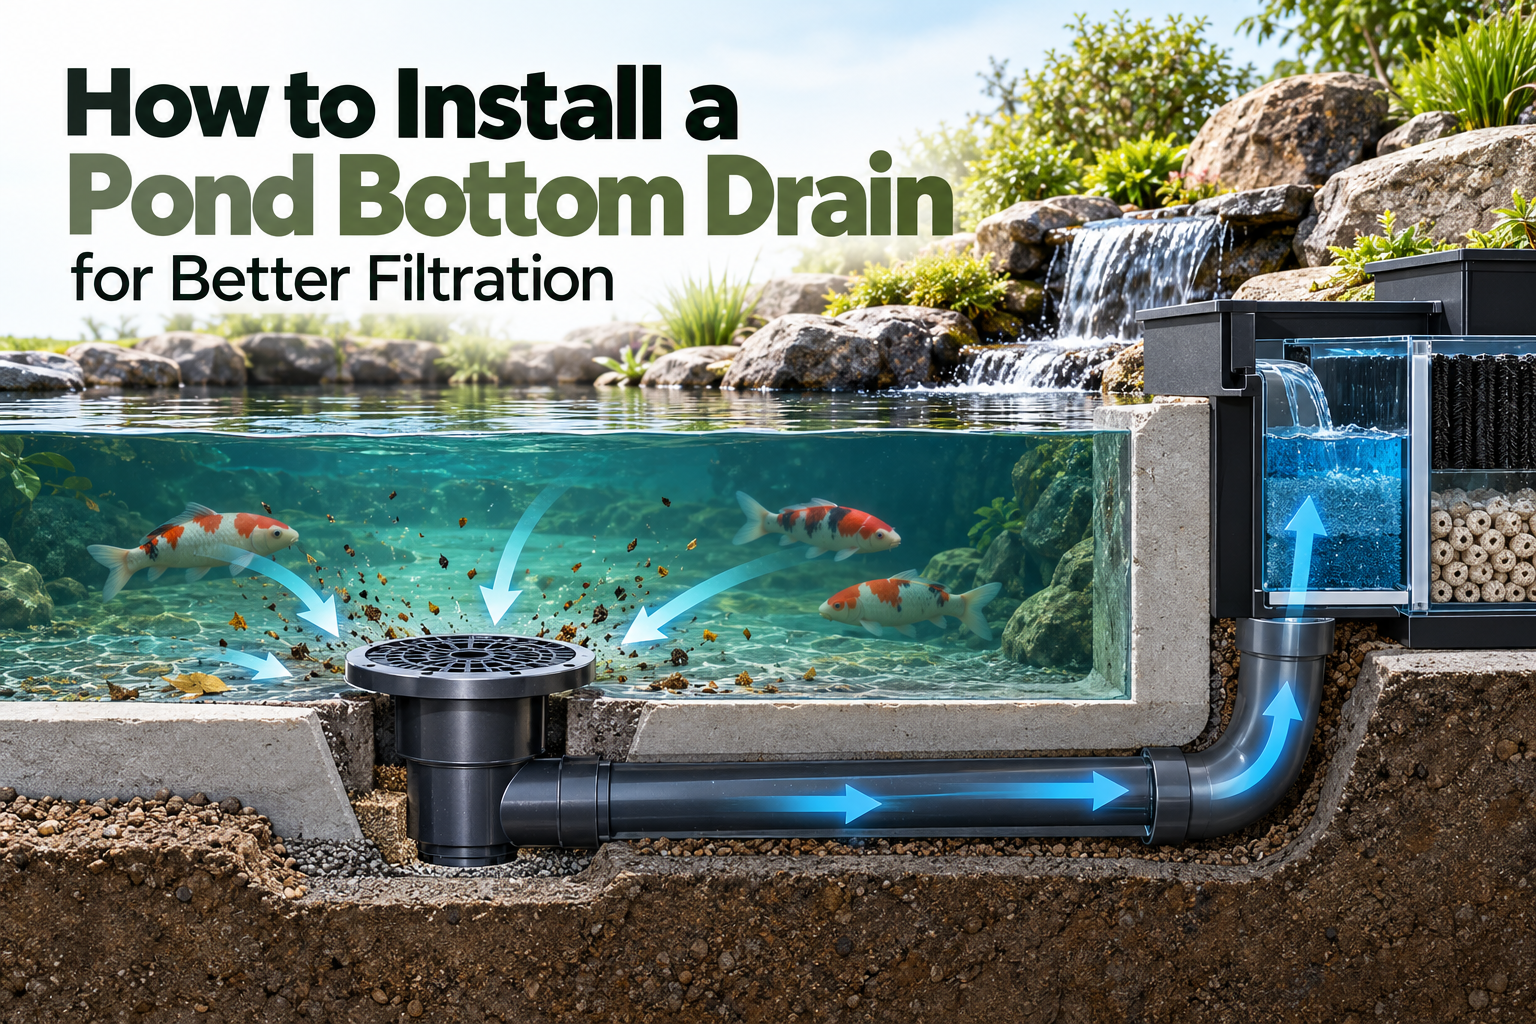
A clean and healthy pond requires an efficient filtration system that removes fish waste, uneaten food, and other debris before they affect water quality. One of the most effective ways to improve waste removal in a koi pond is to install a bottom drain. A properly planned pond bottom drain installation helps transport settled waste toward the filtration system, reduces debris accumulation on the pond floor, and supports better water circulation.
Whether you are constructing a new koi pond or upgrading an existing pond, understanding how a bottom drain works and how to install one correctly can make pond maintenance easier.
In this guide, we explain the benefits of pond bottom drains, the materials required, the installation process, common mistakes to avoid, and how to connect a bottom drain to an effective pond filtration system.
What Is a Pond Bottom Drain?
A pond bottom drain is a plumbing fitting installed at the lowest point of a pond. It collects settled fish waste, uneaten food, and other debris from the pond floor and transports them through a pipe to a suitable filtration system.
Bottom drains are particularly useful in koi ponds because koi fish produce a considerable amount of waste. Without an efficient waste-removal system, organic debris can accumulate, increasing the maintenance requirements and placing additional pressure on the filtration system.
A well-designed pond bottom drain installation typically includes a bottom drain fitting, connecting pipework, and a suitable filtration arrangement.
Depending on the pond design, the system may operate through gravity-fed filtration or a pump-assisted arrangement.
Why Is a Bottom Drain Important for Pond Filtration?
Installing a bottom drain offers several benefits for pond owners.
1. Removes Settled Fish Waste
Fish waste, leftover food, and other organic debris often settle on the pond floor. A properly designed bottom drain helps transport this material toward the filtration system, preventing excessive accumulation.
2. Improves Pond Water Quality
Removing solid waste before it decomposes can help reduce the organic load on the pond filtration system. This supports better water quality when combined with adequate mechanical and biological filtration.
3. Reduces Manual Cleaning
Without a bottom drain, pond owners may need to remove settled debris manually using a pond vacuum or other cleaning equipment.
A correctly designed bottom drain can reduce the frequency of manual floor cleaning, although periodic maintenance is still necessary.
4. Supports Koi Pond Health
Koi require stable water conditions, adequate oxygen, and effective filtration. By improving the removal of settled waste, a bottom drain contributes to a cleaner pond environment.
However, a bottom drain alone cannot maintain water quality. Proper biological filtration, circulation, aeration, and routine water testing are also essential.
5. Helps Maintain Efficient Filtration
When solid waste reaches the filtration system efficiently, mechanical filtration can remove it before it breaks down further.
This allows the biological filtration stage to focus primarily on processing dissolved ammonia and nitrite through beneficial bacteria.
Types of Pond Bottom Drains
Before beginning a pond bottom drain installation, it is important to select the appropriate drain for your pond design and filtration system.
1. Standard Pond Bottom Drain
A standard bottom drain is installed at the lowest point of the pond floor. Many models include a protective dome that helps direct water and debris into the drain while preventing large objects or fish from entering the pipe.
This type is commonly used in koi ponds with dedicated bottom-drain pipework.
2. Aerated Pond Bottom Drain
An aerated bottom drain combines waste collection with air delivery. An air pump supplies air to a diffuser, creating rising bubbles that encourage water circulation and help maintain oxygen levels.
This design can be especially useful in koi ponds with high fish populations.
The air supply must be sized appropriately, and the diffuser should be maintained according to the manufacturer’s instructions.
3. Pump-Assisted Bottom Drain
A pump-assisted arrangement uses a pump to move water and suspended debris through a suitable drain or intake system.
The pipework, pump position, and drain design must be compatible. Pump suction can create hazards for fish if the intake is not properly designed and protected.
For many new koi ponds, a gravity-fed bottom drain connected to a suitable prefilter is a practical option.
Materials Required for Pond Bottom Drain Installation
Prepare the required equipment before starting the installation.
Common materials include:
- Suitable pond bottom drain fitting
- PVC pipes of the recommended diameter
- Compatible PVC elbows and connectors
- Appropriate PVC primer and solvent cement, where specified
- Waterproofing materials compatible with the pond construction
- Pipe supports and installation accessories
- Mechanical prefilter or settlement chamber
- Biological pond filter
- Suitable valves for isolation and maintenance
- Measuring tape, level, and other installation tools
The exact materials depend on the pond size, construction method, plumbing layout, and manufacturer’s recommendations.
Important: Select the pipe diameter according to the drain manufacturer’s specifications, required flow rate, pipe length, and expected operating conditions. Avoid choosing a pipe size based on pond volume alone.
How to Install a Pond Bottom Drain: Step-by-Step Guide
A successful pond bottom drain installation requires careful planning before the pond floor is completed.
For most new ponds, installing the drain during construction is easier and more reliable than retrofitting it later.
Step 1: Plan the Pond Layout
Start by determining the pond dimensions, water depth, bottom shape, and filtration location.
The bottom drain should generally be positioned at the lowest point of the pond floor so that settled waste can move toward it.
For many koi ponds, a gently sloping floor helps guide debris toward the drain. The appropriate slope depends on the pond design, surface finish, and circulation system.
Consider the following factors:
- Pond length, width, and depth
- Number and size of fish
- Expected water flow
- Drain capacity
- Pipe routing and accessibility
- Location of the mechanical and biological filters
- Access for future maintenance
For larger ponds or ponds with high fish populations, multiple drains may be necessary.
Step 2: Select the Right Bottom Drain
Choose a drain that is suitable for your pond construction and filtration arrangement.
Check the manufacturer’s specifications for:
- Recommended pipe diameter
- Maximum or recommended flow rate
- Installation depth
- Compatibility with concrete, liner, or fibreglass ponds
- Aeration requirements, if applicable
- Maintenance and cleaning access
A drain that is too small for the required flow may not transport waste effectively. An oversized or poorly positioned drain can also affect circulation and system performance.
If you are building a large koi pond, consider consulting a pond filtration specialist before finalising the drain layout.
Step 3: Prepare the Pond Floor
For a new concrete pond, prepare the base according to the structural design before installing the drain.
The drain must be securely supported and positioned at the correct elevation. Ensure that the surrounding construction provides sufficient support without placing damaging stress on the drain body or pipe connections.
For liner ponds, use a bottom drain specifically designed for liner installations. The liner must be securely clamped or sealed using the manufacturer’s approved method.
Important: Do not improvise waterproofing around the drain. Incorrect sealing can lead to leaks that are difficult to repair after the pond is filled.
Step 4: Position and Secure the Drain
Place the drain at the planned low point of the pond floor.
Check that it is level and aligned with the intended pipe route. Secure the drain so that it cannot shift while the surrounding concrete or other construction materials are installed.
If you are using an aerated bottom drain, plan the air line routing and diffuser connections at this stage.
Keep all serviceable components accessible wherever the design allows.
Step 5: Install the Drain Pipework
Connect the bottom drain to the filtration system using compatible pipes and fittings.
The pipe route should be as direct as practical, with unnecessary bends avoided to reduce hydraulic resistance and simplify maintenance.
During installation:
- Measure and cut the pipe accurately.
- Dry-fit the components to confirm alignment.
- Prepare the pipe ends according to the adhesive manufacturer’s instructions.
- Join the pipes using compatible fittings and approved joining methods.
- Provide suitable support to prevent movement or stress at the joints.
- Allow joints to cure for the specified period before testing.
For gravity-fed systems, the pipe diameter, elevation, length, and fitting arrangement must support the required flow without excessive restriction.
For pump-assisted systems, confirm that the pump and drain arrangement are compatible and that the intake is safe for fish.
Step 6: Connect the Bottom Drain to the Filtration System
The next stage is connecting the drain pipe to an appropriate filtration arrangement.
A common gravity-fed koi pond system follows this sequence:
Pond Bottom Drain → Mechanical Prefilter → Biological Filter → Pump → Pond Return
The mechanical prefilter removes larger particles and suspended waste. The biological filter provides surface area for beneficial bacteria that convert toxic ammonia into nitrite and then nitrate.
The pump returns filtered water to the pond through suitable outlets.
Depending on the design, the system may also include a UV clarifier, aeration equipment, a skimmer, or additional filtration stages.
The exact order of components can vary. For example, a UV clarifier may be installed on a suitable pressurised return line. Follow the manufacturer’s flow and installation requirements.
Step 7: Complete the Pond Floor and Waterproofing
After the drain and pipework have been positioned, complete the pond floor according to the construction design.
Ensure that the finished surface guides waste toward the drain without creating unwanted depressions where debris can accumulate.
For concrete ponds, allow the structure and waterproofing system to cure fully according to the product instructions.
For liner ponds, inspect the drain-to-liner connection and check that the liner is not stretched, damaged, or incorrectly clamped.
Waterproofing is particularly important around pipe penetrations because these areas can become potential leak points.
Step 8: Test the System Before Adding Fish
Before introducing fish, test the completed pond bottom drain installation.
Check the following:
- Pipe joints and connections for leaks
- Drain operation and water movement
- Water level stability
- Pump performance and flow rate
- Mechanical prefilter operation
- Biological filter connections
- Air supply, if using an aerated drain
- Drain access and maintenance arrangements
Observe whether debris moves toward the drain under normal operating conditions.
If the pond contains areas where waste consistently accumulates, the circulation layout, drain position, or return outlets may need adjustment.
Do not add fish until the pond is safe, the water has been appropriately conditioned, and the biological filtration system is ready to support the intended fish population.
Common Pond Bottom Drain Installation Mistakes to Avoid
Even a good-quality bottom drain can perform poorly if the installation is not planned properly.
1. Installing the Drain Above the Lowest Point
If the drain is higher than surrounding areas of the pond floor, debris may accumulate in the lower sections.
Solution: Plan the floor levels carefully and position the drain at the intended collection point.
2. Using Incorrect Pipe Dimensions
A pipe that is too restrictive can reduce flow and allow debris to accumulate.
Solution: Choose the pipe diameter based on the drain specifications, required flow, and plumbing layout.
3. Poor Waterproofing
Incorrect sealing around the drain can cause water leaks and expensive repairs.
Solution: Use compatible sealing materials and follow the drain and waterproofing manufacturers’ installation instructions.
4. Ignoring Water Circulation
A bottom drain cannot remove all debris if the pond’s circulation pattern leaves stagnant areas.
Solution: Plan the return inlets, water flow, and drain position as a complete system.
5. Connecting the Drain Without Suitable Mechanical Filtration
Solid waste can pass into downstream equipment if it is not intercepted effectively.
Solution: Use a compatible mechanical prefilter or another suitable solids-removal stage.
6. Making Maintenance Difficult
Poorly positioned valves, inaccessible pipework, and difficult-to-open filter chambers can make routine maintenance unnecessarily complicated.
Solution: Include practical access for inspection, isolation, flushing, and cleaning during the design stage.
How to Maintain a Pond Bottom Drain
Regular maintenance helps keep the drain and filtration system operating efficiently.
Follow these practices:
Inspect the drain regularly: Check for visible obstructions and ensure that the protective dome or other components remain correctly positioned.
Monitor water flow: A sudden reduction in flow may indicate a blockage, a dirty prefilter, a pump issue, or another plumbing problem.
Clean the mechanical filter: Remove collected waste according to the filter manufacturer’s instructions.
Inspect accessible pipework: Check for leaks, loose connections, or signs of damage.
Maintain aeration equipment: If the drain is aerated, inspect the air pump, tubing, and diffuser periodically.
Test pond water: Monitor ammonia, nitrite, pH, and other relevant parameters to assess overall pond health.
Avoid opening buried pipework unnecessarily. If a blockage is suspected, identify the likely cause and use a suitable cleaning method that will not damage the plumbing.
Can You Install a Bottom Drain in an Existing Pond?
Yes, a bottom drain can sometimes be added to an existing pond, but the process is generally more complicated than installing one during new construction.
The method depends on the pond’s structure, waterproofing, floor material, and available pipe routes.
Possible approaches include:
- Retrofitting a bottom drain through a suitably modified pond floor
- Installing an external intake arrangement designed for the application
- Using a pond vacuum or other waste-removal equipment as an alternative
Cutting into an existing concrete pond can affect structural integrity and waterproofing. Before making modifications, assess the pond structure and plumbing requirements with a qualified professional.
For some existing ponds, improving circulation or adding a suitable pond vacuum may be more practical than installing a traditional bottom drain.
Choosing the Right Filtration System for Your Pond
A bottom drain works best when it is matched with an appropriate filtration system.
The right configuration depends on pond volume, fish population, feeding rate, desired water quality, and available maintenance time.
Mechanical Filtration
Mechanical filtration captures suspended solids and organic debris before they break down.
Examples include settlement chambers, sieve filters, and suitable mechanical filter units.
Biological Filtration
Biological filtration provides a surface for beneficial bacteria that help process ammonia and nitrite produced by fish and decomposing organic matter.
Common media include biological filter media, ceramic media, and specialised pond filter media selected for the system.
Pond Pumps
A suitable pond pump moves water through the filtration system and returns it to the pond.
When choosing a pump, consider the required flow rate, pipe diameter, pipe length, elevation changes, and resistance from filters and fittings.
Always select equipment based on its performance under actual operating conditions rather than relying only on the pump’s advertised maximum flow.
UV Clarifiers
A UV clarifier can help control suspended green-water algae when properly sized and installed.
It does not replace mechanical or biological filtration and will not remove all forms of algae attached to pond surfaces.
Combining a correctly installed bottom drain with suitable filtration, circulation, and aeration can create a more manageable pond maintenance system.
Explore the pond pumps, filters, and filtration equipment available at GreenfinIndia.com to find products suited to your pond setup.
Frequently Asked Questions
1. What is the purpose of a pond bottom drain?
A pond bottom drain collects settled waste and transports it toward the filtration system. It helps reduce debris accumulation and supports efficient pond maintenance.
2. Where should a pond bottom drain be installed?
It is generally installed at the lowest point of the pond floor. The exact position depends on the pond’s shape, floor slope, circulation pattern, and filtration design.
3. Is a bottom drain necessary for every koi pond?
Not every pond requires a traditional bottom drain. However, bottom drains are particularly beneficial for larger koi ponds and systems with high fish populations. Smaller ponds may be maintained using alternative waste-removal methods.
4. Can a bottom drain work without a pond pump?
Yes. A gravity-fed bottom drain can transport water to a suitably designed filter chamber without the drain itself being directly connected to a suction pump. However, a pump is commonly used elsewhere in the system to circulate water back to the pond.
5. Does a bottom drain remove green pond water?
No. A bottom drain primarily helps remove settled solids. Green water caused by suspended algae generally requires appropriate filtration, nutrient management, and, where suitable, UV treatment.
6. How many bottom drains does a koi pond need?
The number depends on the pond dimensions, depth, shape, required flow rate, and drain capacity. Large ponds may need multiple drains to provide effective waste collection.
7. Can I install a bottom drain in a liner pond?
Yes. Use a bottom drain designed for liner ponds and follow the manufacturer’s approved clamping and sealing procedure to create a reliable waterproof connection.
8. How often should a pond bottom drain be cleaned?
Cleaning frequency depends on the pond’s fish population, feeding rate, debris load, and plumbing design. Inspect the system regularly and clean or flush it when necessary, following the manufacturer’s instructions.
Conclusion
A properly designed pond bottom drain installation can improve solid-waste removal, reduce debris accumulation, and support more effective filtration in koi ponds and other fish ponds.
The key is to plan the drain position, select compatible pipework, ensure reliable waterproofing, and connect the system to suitable mechanical and biological filtration.
Avoid common installation mistakes and provide easy access for future maintenance. For larger ponds or complex construction projects, professional planning can help prevent costly plumbing and waterproofing problems.
Looking for pond pumps, filtration systems, or pond equipment? Visit GreenfinIndia.com to explore products for building and maintaining a cleaner, healthier pond.